Tuesday, October 30, 2012

NYX blush and Lipgloss review!

 My picture after my birthday dinner showcasing NYX's Blush in Pinched and NYX's lipgloss in Perfect (over a dark peach lipsgtick)

I recently purchased some new NYX products that I'm going to review. I've tried their eyeshadow palette in Champagne and Caviar and did a review which you can see here. I also have their Jumbo eye pencil in Milk to use as a base for some of my eyeshadow looks. Basically, I'm not new to the brand, but I wanted to branch out and try their blushes and lipgloss. I ordered their blush in Pinched, which I've heard is a close dupe for NAR's orgasm blush that everyone raves about. I don't have the NAR's blush to compare it to (I cant justify spending close to 30 bucks for a blush!) but I've hear this NYX blush is pretty darn good! I also ordered one of their mega shine lipglosses in the shade Perfect. It's a beautiful nude that can be worn alone or over a lipstick or a lipliner for more shine. It really is a *perfect* shade in my opinion- it will go with anything! 

So let me get started with a more in depth review of each product, starting with the blush. As I said, I ordered mine in the color Pinched. It is a beautiful golden peach color. It is a little shimmery in swatches, but when applied to the face it just gives a nice beautiful glow to the face. Be careful with this blush though--you can easily over do it! I barely touched the blush with my brush and got a nice application. This blush blends beautifully as well! I have a feeling this may be my new go-to blush! Here are some swatches and you can also see it in action on the picture above!


This swatch shows the more pinky tones
This swatch shows the more simmer notes in this blush- this is what gives you the healthy beautiful glow!

Now on to the lipgloss. I have the Mega Shine Lipgloss in Perfect, and I must say- I think it's just that! This gloss has is a beautiful peachy/pinky/nude with a nice shimmer- NO FROST! It will make any lipstick pop and have just a hint of golden shimmer. This can be worn alone for just a beautiful natural shimmer to your own lipcolor as well! This is definitely my new favorite gloss! It goes on super smooth (with a doe foot applicator), it is NOT super sticky, but seems thick enough to have decent staying power. Nothing irks me more then a super sticky gloss--you know the kind where you apply it and you open your mouth and you feel that goopiness between your upper and lower lip..blech! Over all, I think this is an amazing gloss, I will definitely be repurchasing this in the future and I'll for sure be checking out other shades from this line as well! Here are some swatches for you (you can also see this lipgloss in action over a lipstick in the above picture too!

lipgloss straight out of the tube, no other color on the lips
lipgloss over Revlon's lipstick in Peach
Hope you enjoyed this review! I promise to have some new tutorials up soon too! Keep checking back, and leave any requests in the comment section!

Sunday, October 28, 2012

Rimmel London Gloss Lip Liner review!


I was browsing around my grocery store where I work, and stumbled accross these little babies, the Rimmel London Gloss Lip Liner, for 99 cents for a pack of 2. I do work in a discount store, so normal retail price may be higher. I have never been a big lip liner person (unless its for a bold lip). But I figured for 99 cents, I would give these guys a try! I picked up 2 packs, so 4 lip liners. The colors are Hot Spark, Be a Star, Sorbet, and Moreish. Here are some swatches to start off:

Top to bottom: Sorbet, Moreish,Hot Spark, Be a Star
I've never tried a gel lip liner before, the texture is quite interesting. When I tried them on the lips, I lined my entire lip then filled them. These have the texture of a lipstick and gloss combined, the definitely have a nice glossy shine, although they do tend to set and lose a bit of their *gloss* over time and become more matte. . I personally have worn them alone and with a lipstick. They go on incredibly smooth and feel quite nice on the lips. The staying power isn't as great as it could be- but I blame that on the *gloss* quality of these. I just don't think anything  with a *glossy*  texture is going to have great staying power on the lips because most people are constantly talking, and moving the mouth. But then again - I seem to have trouble getting ANY kind of lip product to stay on for more then an hour. So perhaps I'm a little bit negatively biased towards a lot of lip products. They are all quite glossy looking, but some are definitely moreso then others. Even though the staying power isn't fantastic for me, I still enjoy the texture and look of the product on the lips.

My BIGGEST pet peeve with this product IS because it is a glossy liner. Being such a soft alomst gel like consistency, these pencils are gonna wear down rather quickly, and need to be sharpened a lot! Just after one use of lining and filling in my lips, the original tip was worn about half way and obviously no longer sharp. Most lip liners have a bit more solidity therefore they last longer.

I had a lot of trouble finding this product on other websites, there are a few on amazon. This product isn't even listed on Rimmel's website. I'm thinking this may be a discontinued product.

I don't think this is a *horrible* product per say, but I understand why it didn't exactly take off. The pencils have great color pay off, great texture, but really lack on the staying power- which is a huge downside because a lip pencil is supposed to make your lipstick LAST longer. So, depending on how you use this product will depend on how much you enjoy it. I'm glad I picked them up, and will probably continue to use them while I have them - but I'm not sure I would have ran out and repurchased them if they were still readily available.

Enough of my rambles, here are some pics of the products on:
Be a Star

Hot Spark

Moreish

Sorbet
Thanks for checking back, and I hope you this review was helpful for you! I have a lot more product reviews and tutorials coming up, I've been battling a horrible bronchitus for a couple weeks now- once I'm 100% back to normal I'm going to get crackin on some new stuff! Hope you stick around and check back in the near future!

Sunday, September 30, 2012

how to sport a bold lip (red and pink!)


For this blog post, I'm going to be showing you how to rock a bright lip. I've recently decided to be more daring with my lip products (and toning down the eyes!). Embracing a brighter or deeper lip color is great for fall--or any time of year. To pull it off you really need a fairly neutral eye look - although I would probably dare to pair with a darker eye look too for something more edgy.. This is a tutorial that will show you how to wear a red lip which is great for night time, or a brighter pink for daytime wear. Although these aren't rules..cause I rock red lips during the day too! You will notice in the following pictures, that I sometimes have short hair, and other times longer--these were taken over a few different times of rockin the lip so I could get a more varried choice of pictures to add to this blog You'll also notice that on the pics where I have shorter hair, I did line my upper lash line with a liquid liner. You can do either- I just wanted a little bolder look that particular day. So..enough blabbing, on with the tutorial!

I started off this look with the most obvious thing- Urban Decay Primer Potion on the lid and brows. On the lid I started off with a flesh colored eyeshadow (use whatever matches YOUR skintone) and i placed that all over the eye are clear up to the brows. This will also act as a highlight after we add the crease color. For the crease I used Teased from the Naked 2 palette, but any matte shadow thats a few shades darker then your natural skin tone will work. Basically you just want to deepen the crease a little bit to create the illusion of a shadow where  your natural crease is. All you're really doing is creating a more perfect version of your natural eye. You don't want to LOOK like you have eyeshadow on, it should look completely natural. In some of the pics I did follow these steps with a liquid black liner on the upper lash line for a more edgy and bold look. You don't have to, if more natural is your thing, then go for it! I then filled in my brows with a pencil and set it with a powder that matches my hair my darker hair. The last step for the eyes is to throw on your favorite mascara!

For the face, I just used my regular foundation, and buffed it into the skin with circular motions with a stippling brush. Make sure you cover all your under eye circles with a concealor as well as any blemishes. After that I powdered the face to get rid of any shine (damn you oily skin!) But if you prefer a more dewy, natural finish you can skip the powder. I applied blush to the apples of the cheeks and blended back toward the hair line. I didn't contour or apply any kind of highlight..I wanted the focus of these looks to be the lips.

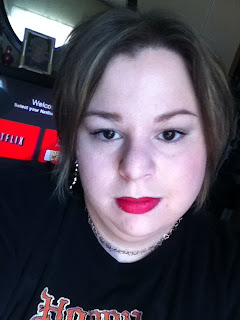
Now for the fun part of the look. For the red lips I started off with a red lip liner and lined and filled my ENTIRE lip in (just a tip- if you have chapped or dry lips, try applying a chapstick when you first start your makeup to smooth everything out--then remove before you start applying your liner and lipstick). Once you have the entire lip filled in with liner, go back and top it off with your favorite red lip. You can add a gloss if you'd like or leave it matte. I've really been enjoying a matte lip lately so I skipped the gloss. For the pink lip, I don't own a lipliner, so I just went straight in with the lipstick. I do feel it would have went on smoother if I had a lipliner, but alas..I'm working with what I've got! If you want your lipstick to last ALL day, you can blot your lipstick, then add a light dusting of a translucent powder on top, then reapply your lipstick and blot a second time. Unless you do major eating-this will keep your lipstick on for a good long time!

So..now for the finished looks, I'll show you the red first, followed by the pink. The bottom will have a list of all products used!


Products Used:

EYES

Urban Decay Primer Potion (original formula)

Wet n Wild Vanity palette- lightest skin tone color for the lid, and Urban Decay's Tease (from the Naked 2 palette) in the crease

L'oreal Lineur Intense in Carbon Black #H200 (upper lash line) - for pics with liquid liner on upper lash lin

Urban Decay's SuperCurl mascara

Brows- Wet n wild Pencil in-taupe    And I used the wet n wild eyeshadow palette Vanity, I used the medium matte brown shade to set the pencil

FACE

Primer: Loreal- Studio Secrets face primer

Foundation: Urban Decay's Naked Skin foundation in 3.5

Blush: wet n wild's in Heather Silk

Conealor: Mac's Studio Fix concealor in NW20

Powder: Mac's Studio Fix Plus Powder Foundation in NW20

LIPS
Red lip: Rimmel Exaggerate lip pencil in Red Diva and Wet n Wild Mega Last Lip color in Stoplight Red.
Pink lip- Wet n Wild Mega Laset Lip color in Dollhouse Pink


Brushes Used:

Real Techniques Stippling blush to apply foundation

Urban Decay's double ended brush (comes in Naked 2 palette)

Elf blending brush (essential line) to blend all the colors seamlessly together.

Elf face brush (essential line) to apply face bowder

Elf blush brush (studio line) to apply blush and contour with elfs bronzer

Elf eyeshadow brush (essential line) for concealor

Revlon angle liner brush for brows

Wednesday, September 26, 2012

Im back!! With a fall look!

So, I haven't had a working laptop for quite some time. But I' m excited to be back! I have lots of good products to review, and I'm always looking for more to try out. But my first post back is going to be a bronzy/fall look. I hope you all enjoy and start coming back regularly again!

I started off this look with Urban Decay's Primer Potion, all over the lids and up into my brows - I've noticed this helps my brow pencil and powder to stay on better. So I my first shadows were a mix between chopper and half baked from the Naked 2 palette- I packed this mix onto the lid. I then took a mix of busted and tease into the crease and blending slightly up, and then to darken the outer V I took a tiny amount of blackout - also from the Naked 2 palette and worked it carefully in--it can easily get out of hand, so use a light touch! I highlighted with foxy from the Naked 2 palette which is a matte cream color..you don't want ALL shimmer on the eyes at the same time--and most of those previous shadows were shimmer. I filled in my brows with a pencil, then set it with a powder using an angled liner brush for precise application. I took a black liquid liner and lined my upper lash line and took it out and created a nice wing. I finished off the eyes with a curling mascara.

I moved on to the face and used a primer to start out--always use a good base--it will help the rest of your makeup go on really nice and last much longer. So after I applied my primer I would apply my foundation with a stippling brush-buffing it into the skin. Then concealed my blemishes and under my eyes (damn those dark circles!) with my concealor. I lay it down with a brush first, then pat it in to the skin...using your hands will warm up the product more and allow it to blend easier (some days I even skip the brush all together). I set everything with my Mac studio fix foundation and a big fluffy brush. I followed that up with my blush on the apples of the cheeks and a quick bit of lipstick. The following are pictures of the final look and followed by a list of all the products used. Thanks for checking back in and I look forward to continuing this blog!


Products used:

Products Used:

EYES

Urban Decay Primer Potion (original formula)

Urban Decay Naked 2 palette (all shadows)

L'oreal Lineur Intense in Carbon Black #H200 (upper lash line)

Urban Decay's SuperCurl mascara

Brows- Wet n wild Pencil in-taupe    And I used the wet n wild eyeshadow palette Vanity, I used the medium matte brown shade to set the pencil

FACE

Primer: Loreal- Studio Secrets face primer

Foundation: Urban Decay's Naked Skin foundation in 3.5

Blush: wet n wild's in Heather Silk

Conealor: Mac's Studio Fix concealor in NW20


Powder: Mac's Studio Fix Plus Powder Foundation in NW20

LIPS

Mac's Prolongwear Lipcreme in Unlimited 

Brushes Used:


Real Techniques Stippling blush to apply foundation

Urban Decay's double ended brush (comes in Naked 2 palette)

Elf blending brush (essential line) to blend all the colors seamlessly together.

Elf face brush (essential line) to apply face bowder

Elf blush brush (studio line) to apply blush and contour with elfs bronzer

Elf eyeshadow brush (essential line) for concealor

Revlon angle liner brush for brows

Tuesday, October 25, 2011

Poisoned Papaya

I actually did this look almost 2 weeks ago, but I haven't posted it because I couldn't come up with a good name for it...lame I know. Plus I couldn't decide if I actually liked the look, but after much deliberation and staring at the pics, I've decided I like it and want to post it for you guys! .lol. So here it is, and I hope you like it!


*See this link for code for the 120 palette
 I started off with my Urban Decay Primer Potion, as usual. I then started off the colors by applying the color H3 (a burnt orange color,it was broken in my palette *sad face*--but I fixed it, so yay!) to my entire lid. I then took a mix of F4 and F7 both beautiful teal blues. and applied them to my crease and blended up. I then took a mix of J6 and J10 (both mid-tone purples)and smudged it into the lower lash line. I took the color L6 and applied it to my brow bone for a beautiful white shimmery highlight. I applied my liquid liner to my upper lash line and applied Urban Decay's superCurl mascara. To finish off the eyes I line my lower lash line with my gel liner and filled in my brows with a dark brown eyeshadow.

I then moved on to my face. I applied my Hard Candy primer and foundation to my face. I then took my Elf blush and applied it to my cheeks and sweeping it up towards my temples. To finish off my face, I applied my Urban Decay Finishing powder to set my foundation. I dabbed it on all around my face and buffed it in with a soft face brush. To finish off my look I applied Elf's Lipstain in Fashionista.

Products Used:

EYES

Urban Decay Primer Potion (original formula)

120 Eye palette (1st Edition)

L'oreal Lineur Intense in Carbon Black #H200 (upper lash line)

Maybelline Gel liner: black (waterline)

Urban Decay's SuperCurl mascara

NYX Champagne and Caviar: darkest matte brown to do my eyebrows

FACE

Hard Candy Face Primer

Foundation: Revlon ColorStay in 150 Buff

Blush: elf's blush and bronzer duo

Urban decay's Razor Sharp Ultra Definition finishing powder

LIPS

Elf's Lip stain/gloss in fashionista

Brushes Used:

Elf essential eyeshadow brush to pack color on everywhere and do light blending

Elf eyeshadow brush (studiol line) brush for the highlight

Elf blending brush (essential line) to blend all the colors seamlessly together.

Elf blush brush (studio line) to apply blush and contour with elfs bronzer

Elf concealer brush (essential line) to fill in my eyebrows

Monday, October 24, 2011

Cheshire Cat!

I did this look for work the other day, I wanted something fun and colorful (big surprise), but at the same time something that wouldn't take too long to do. I was inspired by everyone elses interpretation of the cheshire cat from Alice In Wonderland. I just went with a basic pink and purple look, but I think it turned out quite nicely. This look is very similar to my recent post for the Pink Panther, but I don't care I like both looks in their own right. Both deserve a post...so here ya go:


*See this link for code for the 120 palette

As always, I started off with my Urban Decay Primer Potion spread across my entire eye area. I then started off with my eyeshadow brush and took the color I2 a very bright pink and packed it all over my entire lid and up into the crease. I then took a combination of the colors J6 and J10 (2 beautiful mid-tone purples) and created a high cut crease blending up.  I did not blend the pink and the purples because I wanted a nice crisp cut crease look. I did take a blending brush and blend out the edges of the purple. I then added a bit more of the purples to keep the intensity while keeping the edges blended out. I then took L7and applied it under my brow as a highlight, starting at the middle of the brow and blending out in both directions. To finish off the eye I applied my gel liner to my upper lash line and lower waterline. I then curled my lashes and applied Urban Decay's SuperCURL mascara. (I usually don't bother curling my lashes with this mascara cause it does an amazing job on it's own, but wow..it looks even BETTER when I curl them too! To finish off the eye I filled in my brows with a dark brown matte eyeshadow.

I then moved on to my face, applying me Hard Candy primer and then my foundation directly afterward. Both were applied using my hands. I then applied my blush onto the apples of my cheeks and blended up towards my temples. To finish off the face I applied my finishing powder and sprayed my face with setting spray! To completely finish my look I added just a simple lip gloss.

Products used:

EYES

Urban Decay Primer Potion (original formula)

120 eye palette (1st edition) for all eyeshadows (unless otherwise mentioned)

Maybelline Gel liner: black (upper lash line and waterline)

Urban Decay's SuperCurl Mascara

NYX Champagne And Caviar palette (darkest matte brown to fill in brows)

FACE

Hard Candy Face Primer

Foundation: Revlon ColorStay in 150 Buff

Maybelline Age Rewind Eraser Dark Circles in 10 Fair (this stuff is AMAZING!!)

Blush: elf's blush and bronzer duo

Urban Decay's Razor Sharp Ultra Definition Finishing Powder

Urban Decay's All Night Setting Spray

LIPS

NYC Kiss Gloss in Park Ave Punch #532

Brushes Used:

Elf essential eyeshadow brush to pack color on everywhere and do light blending

Revlon's Smokey eye Brush (for eyeliner)

Elf eyeshadow brush (studiol line) brush for the highlight

Elf blending brush (essential line) to blend all the colors seamlessly together.

Elf blush brush (studio line) to apply blush and contour with elfs bronzer

Elf concealer brush (essential line) to fill in my eyebrows

Mac Studio Fix Powder Plus Foundation Review!

The compact on the outside

The Powder on top

the secret compartment in the bottom with the sponge
Well ladies and gents, I finally did it! I got my hands on some Mac. This stuff is super expensive, but I can see why everyone raves about it! I have super oily skin and this is the absolute perfect foundation for anyone that has it. It is super light weight--I can't even feel it on my skin! The lady at the counter matched me to my perfect shade and she did a FABULOUS job! It blends so naturally and effortlessly into my skin! Basically it makes me look like I was born with amazing skin (which I wasn't ha! --I wish!). You get medium coverage but it is totally buildable for a good full coverage. When I went to the mall yesterday --I went with no make up on my face (just my eye make up) and even without any kind of primer or concealor on my face I still got some really great coverage. today I'm gonna try it with my primer and concealer to cover up my pesky pimples. Anyway this stuff goes on like silk and covers really well. It wasn't too powdery or heavy...basically what I'm getting at is---THIS STUFF IS AMAZING! It costs 26.50 plus tax which is definitely on the pricey side, but if you look at the fact that it takes the place of foundation and powder and concealer (you might need a tad bit more concealer to cover a few bad blemishes or something)..but still you get pretty much everything in one. And it will last you quite a while I'm guessing with the amount of product in the pan. So all in all, I definitely think this is worth the buy...and I have a feeling I'm going to be buying some more MAC products in the future...MAC=love! Definitely check this stuff out if you have oily skin, but be sure to have a Mac consultant match you to you're perfect shade the first time, you won't be disappointed!!

Friday, October 21, 2011

Maybelline Instant Age Rewind Eraser for Dark Circles

So I was watching a beauty guru on youtube (makeupbytiffanyD), and I seen her do a review of her favorite foundations and concealers and she mentioned the Maybelline Instant Age Rewind Eraser for Dark Circles. She said it did wonders for her under eye circles. I have horrendous under eye circles, I'm not sure if it's from stress, or lack of sleep, or really crappy genetics--but they are bad. My current concealer wasn't really helping much, plus it tended to settle in those fine lines I'm starting to get around my eyes (*shakes fist at father time*). So I was at the store the other day and decided to have a look and see if I could find this stuff. We'll needless to say, I happened upon it, and it is AMAZING! My shade is Fair (#10).  Here's some pics and my full review:


I'm going to start off with the packaging. I was a bit scared of the pouf that is attached to the top. It's one of those twisty containers where you turn it and the product comes out of a sponge at the top. I've always thought these things were pretty unhygenic. I guess this thing is anti-microbial, which I suppose it to help stop the spread of germs and whatnot. So I guess I can overlook that. It took me about 3 minutes of continuous twisting to get the product to come out of the top, which was a pain in the arse, but it eventually came out. I had visions of twisting it too much and half the container coming out! haha! But all worked out well, and I can deal with the packaging. Also the pouf thing at the top is quite smooth so it doesn't tug at the delicate under eye skin.

As for the product itself. It is AMAZING stuff. It is very thin in texture which is nice. It's not thick or creamy..it almost has the texture of a moisturizer. It's also very very pigmented, which is awesome. You don't need much of this product and it covers gloriously! It spreads out evenly and you can't even tell it's there. It's almost silky in texture actually. This stuff does NOT settle in those nasty little lines either! This is probably some of the best concealer I've ever used! It goes on great and lasts all day. I highly recommend this stuff, definitely check it out!!

Pink Panther goes to Hollywood!

I've been toying with the idea of creating and naming a look like this. I love pinks and purples (especially together), and I was watching something the other day and the pink panther song came on. So I decided to dig through my stuff and come with a look and name it after the pink panther. I threw in some sparkles and a bit of purple to glam it up a bit. The sparkles represent the jewels he's always lookin for, and the purple is because sometimes in the drawings his outline looks a bit purpleish. Hence I came up with the name *Pink Panther goes to Hollywood*! Let me know what you guys think and I hope you enjoy!


*See this link for code for the 120 palette
I started off with my Urban Decay Primer Potion (as usual). I started off this look by applying Urban Decay's cream shadow in Sphynx on my lid . Sphynx is a light baby pink with loads of sparkle and shimmer. I applied 3 layers (allowing it to dry between each layer) to build up to a nice opaque pink shimmer color. I then took the color I2 (a matte bright pink) from my 120 pallete and applied it to my a crease and blended up. I then took the color I-1 (a darker shimmery pink) and applied it to my deep crease without blending up much. I wanted the matte brighter pink to still be seen quite a bit above the deep crease. I then took a mix of J6 and J10 (2 beautiful purples) and created a really high cut crease, I then brought it around to meet the outer corner of my eye. I  carried this color all the way around to meet my inner corner as well. Basically creating an outline of the entire pink parts of the eye. I then continue with the same colors and smudged them into my lower lash line and connected the purple on the bottom with the purples on the top. I did not want to blend any of the purple into the pink much because I wanted a stark cut between colors. I then added L7 (a creamy white) as a highlight under my brow. I then took my gel liner and lined my upper lash line only, winging it out just a tiny bit. Lastly, curled my lashes, added mascara and filled in my brows.

I moved on to my face and applied my elf primer using my hands and then my foundation as well. I then applied my blush and my finishing powder. To complete my look I applied my lipstick and gloss.

Products used:

EYES

Urban Decay Primer Potion (original formula)

Urban Decay's Cream Shadow in Sphynx

120 eye palette (1st edition) for all eyeshadows (unless otherwise mentioned)

Maybelline Gel liner: black (upper lash line)

NYC Skyrise lengthening Mascara in Extreme Black #842

FACE

ELF Face Primer

Foundation: Revlon ColorStay in 150 Buff

Sally Blush (sold at Sally's Beauty Supply)

NYC Transluscent finishing powder

LIPS

Avon's Ultra Color Rich Lisptick in Wink Pink

L.A. Colors Ligloss in Pink Pearl

Brushes Used:

Elf essential eyeshadow brush to pack color on everywhere and do light blending

Revlon's Smokey eye Brush (for angled liner side and smudge side)

Elf blush brush (studio line) to apply blush and contour with elfs bronzer

Elf concealer brush (essential line) to fill in my eyebrows